TL;DR
Moving your rig into a closet can cut noise significantly — if you control reflections, low-frequency buildup, and how you treat the space. Strategic placement and ventilation are key, making a closet a surprisingly effective soundproofed environment.
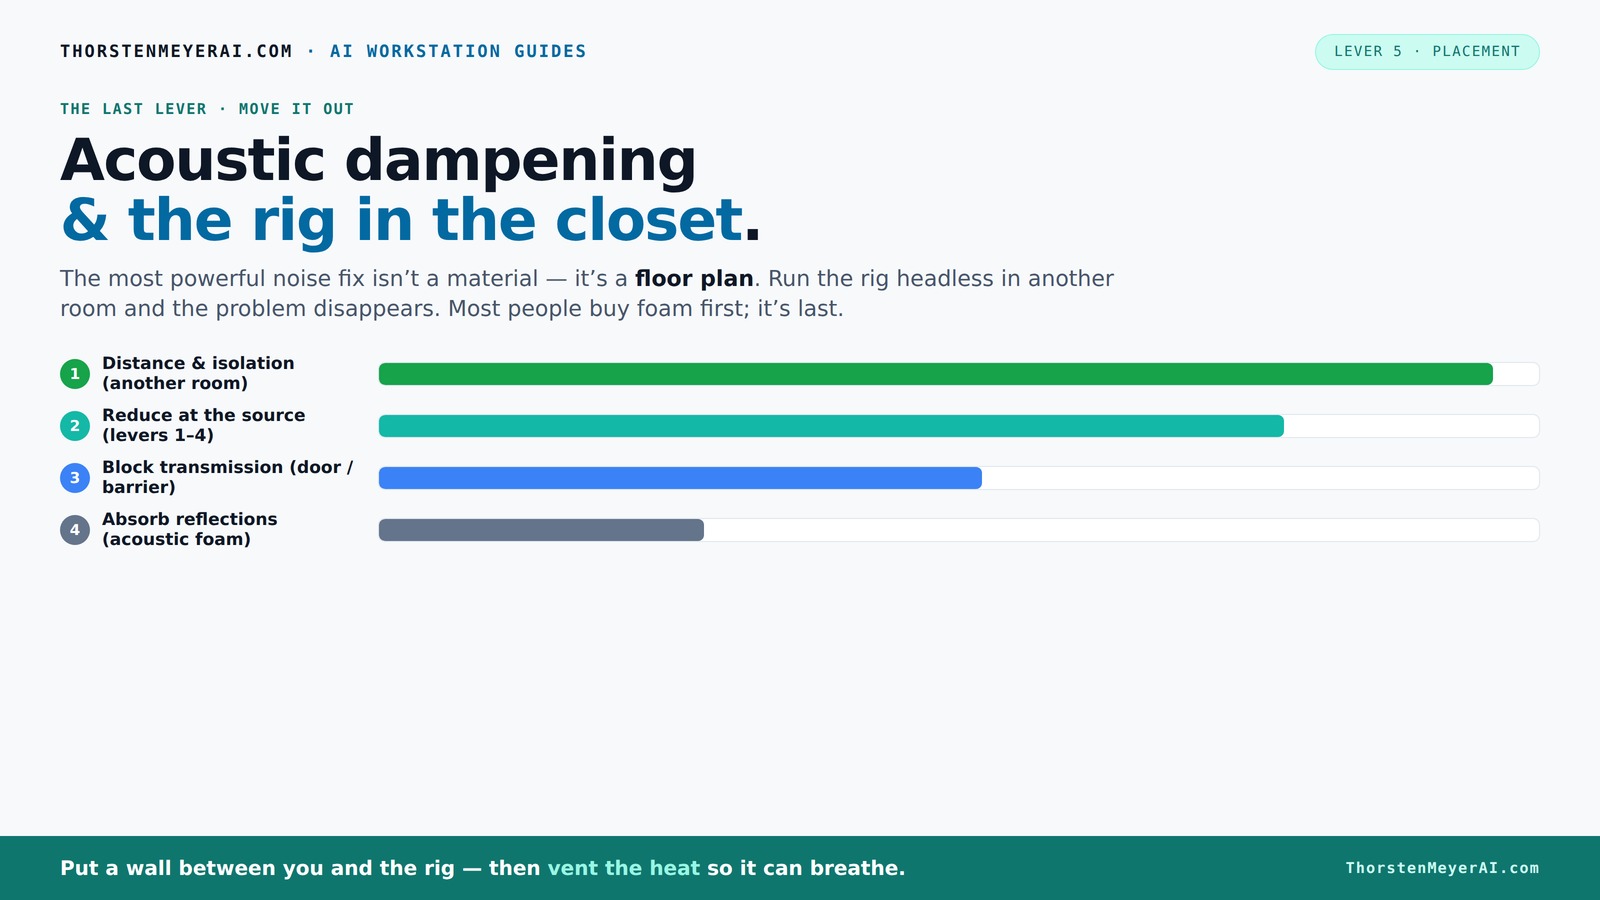
Ever wondered if your closet can double as a vocal booth or a quiet AI rig? Turns out, it can — with a few clever tweaks. Instead of pouring money into thick foam or complicated soundproofing, your best move is to think about placement and control what’s around your rig. That’s the secret to a quiet, clear setup that doesn’t turn your small space into a muddy echo chamber.
This guide cuts through the noise, showing you how to treat your closet, where to put your mic, and how to make your rig both quiet and practical. Whether you’re recording vocals, running a high-power AI workstation, or both, understanding these core principles will save you time, money, and frustration.
Acoustic dampening
& the rig in the closet.
The most powerful noise fix isn’t a material — it’s a floor plan. A rig you can’t hear because it’s in another room beats any amount of foam. Tap the approaches in Part 1 to see what actually works.
(another room)
(levers 1–4)
(door / barrier)
(acoustic foam)
Contain the noise, not the heat
Key Takeaways
- Moving your rig into another room or closet drastically reduces noise, often more than foam or barriers.
- Proper ventilation is critical when placing high-power equipment in enclosed spaces — fan noise isn't the only concern.
- Treat primary reflection points and corners with dense materials for effective acoustic dampening.
- Sealing gaps around the door and using portable treatment options keeps noise leakage minimal.
- Layering treatments (foam, blankets, bass traps) balances sound quality and practicality in small spaces.

Focusound 52 Pack Acoustic Foam Panels 1" x 12" x 12" Sound Proof Foam Panles Soundproofing Noise Cancelling Wedge Panels for Home Office Recoding Studio with 300PCS Double-Side Adhesive
Soundproofing - Acoustic foam panels triangular grooves structure for better noise absorption, helps to reduce and absorb unwanted...
As an affiliate, we earn on qualifying purchases.
As an affiliate, we earn on qualifying purchases.
Why Moving Your Rig Is the #1 Noise Fix (And Why It Matters More Than Foam)
Distance is the best friend your noise ever had. When you put your rig in another room, a closet, or even a basement, the sound that reaches your ears drops dramatically. An AI workstation in a different room can be so quiet you won’t even notice it’s there. This is because sound waves lose energy over distance, especially airborne noise like fans and GPU hums.
Imagine having a noisy GPU tower in your living room. If you move it to a closet on the other side of the house, you might hear almost nothing — even if the fans are spinning at full blast. You’re not just blocking sound; you’re *eliminating* most of it by physically separating the source from you.
For an AI rig, this is a game-changer. You can SSH or API into the machine, leaving the noise behind. All you need is a solid wired connection and good ventilation. Better yet, your workspace stays serene, and your rig can run full throttle without disturbing your day.

Portable Vocal Booth, Home Recording Studio, Echo-Free Sound Isolation Booth for Voice-Over, Podcast & Music - Compact Frame with Thick Acoustic Blankets, Easy Setup
Don’t let poor acoustics hold you back - Experience pristine, echo-free recording with Voctent Portable Studio Booth -...
As an affiliate, we earn on qualifying purchases.
As an affiliate, we earn on qualifying purchases.
The 'Rig in the Closet' Setup — How to Keep It Cool and Quiet
Placing a high-power, heat-generating rig inside a closet sounds smart for noise, but heat is the real villain. Without proper ventilation, your rig’s temperature can soar, causing fans to spin faster and noise to spike. The key is to create a ventilation plan that keeps hot air flowing out while cool air comes in.
Use passive vents or install a quiet exhaust fan. Some builders even use ducted systems with temperature sensors to automatically regulate airflow. For example, a small, quiet exhaust fan can keep a closet cool enough for a 600W GPU setup, preventing throttling and noise spikes.
It’s also worth checking out purpose-built soundproof cabinets, which combine acoustic foam with ducted airflow and temperature control — making your closet both silent and cool. These solutions are especially handy if you can’t move your rig elsewhere. Read more about proper cooling strategies for enclosed setups at this guide.

Kisangel Thick Sponge Soundproof Enclosure Box, Black Sound Deadening Noise Reduction Barrier Generator Cover for Home Commercial Industrial Filter Shield, 11" X 9.8"
Durable and Weather Resistant Material: Made from robust sponge material, this acoustic covers pump soundproof barrier withstands moisture,...
As an affiliate, we earn on qualifying purchases.
As an affiliate, we earn on qualifying purchases.
Acoustic Treatment in Small Spaces: What Really Works?
Acoustic dampening isn’t the same as soundproofing. Foam panels and blankets help reduce echoes and reflections inside your closet but won’t stop sound from leaking out. For a small space, focus on treating the main reflection points: the wall behind the mic, the ceiling, and the side walls closest to your source.
For example, placing a thick panel behind your mic prevents harsh reflections, which muddy your recordings. Covering the ceiling with acoustic tiles stops sound bouncing overhead. Use thick blankets or bass traps in the corners to tackle low frequencies and prevent a boomy, boxy sound.
Remember, small closets naturally cut down reverb because of their size, but parallel walls can create standing waves. Address these with dense bass traps in the corners and by angling panels slightly to break up reflections. Check out this article for more ideas on treatment priorities.

Audimute Soundproofing Acoustic Door Seal Kit - Door Sweep and Seal - (Large Size)
Includes (2) Door Seals (3/16" x 1/2" x 50') and (1) Door Sweep (1/2" x 1.5" x 25').
As an affiliate, we earn on qualifying purchases.
As an affiliate, we earn on qualifying purchases.
Where to Put Your Mic for Perfect Sound in a Closet
The best mic placement minimizes reflections and captures your voice clearly. Position your mic away from the walls, ideally 6-12 inches in front of you, and slightly above mouth level. Use a reflection filter or a portable shield to block sound bouncing off nearby surfaces.
Imagine recording a vocal in a closet. If your mic is too close to the wall behind you, you get a muddy, boxy sound. Move it to the reflection point — usually about 2-3 feet in front of the wall — and add a small foam panel or blanket behind the mic for extra absorption.
Experiment with mic angles, and listen for comb-filtering or echo. The goal is a clear, natural tone, not a reverberant mess. Check out this guide for more on optimizing mic placement in small rooms.
Sealing the Closet Door: Why It Matters and How to Do It
Sound leaks through gaps and cracks around the door, ruining your quiet space. Sealing the door with weatherstripping, draft stoppers, or a heavy moving blanket can cut noise transmission significantly. Imagine using a thick moving blanket over the door frame and sealing all gaps with weatherstripping tape — instantly quieter.
For high-quality results, add a door sweep or draft blocker at the bottom. For extra soundproofing, hang a thick quilt or acoustic blanket over the door when recording or working. These simple steps turn your closet into a much more isolated environment.
Blocking sound at the door is often overlooked but can reduce noise leakage by 20-30 dB, making a huge difference. Read more about soundproofing doors at this resource. Read more about soundproofing doors at this resource.
Treating Corners and Ceiling: The Low-Frequency Solution
Corners and ceilings are low-frequency hotspots — they trap bass and muddy your sound. Use dense bass traps or thick absorption panels in the corners where walls meet and at the ceiling edges. For example, installing large, dense foam panels or DIY bass traps in the corners can tame booming lows and give your vocals clarity.
In a tiny closet, even a small corner bass trap can cut down on low-end muddiness. For ceilings, hanging heavy panels or using cloud bass traps helps prevent sound from bouncing overhead. This creates a more balanced, natural sound without that hollow or boomy quality.
Check out this article for detailed corner treatment tips.
Are Rugs, Blankets, and Foam Enough? When to Up Your Treatment Game
Rugs, blankets, and foam are great starters but have limits. Foam absorbs mid and high frequencies well, but low-end control needs heavier, denser materials like thick blankets or specialized bass traps. For example, a thick moving blanket draped over a rack or a pile of old rugs can absorb a surprising amount of bass and prevent harsh reflections.
If your sound still feels muddy or hollow after basic treatment, it’s time to add bass traps or thicker panels. A combination of all these materials — foam for highs, blankets for mids, bass traps for lows — creates the most balanced environment.
For DIY options, consider stacking blankets or using thick curtains to supplement foam panels. See this guide for detailed treatment strategies.
How to Keep It Practical for Daily Use Without Turning It Into a Box
Small spaces can sound great without feeling cramped if you plan your setup right. Use portable treatments like foldable panels, removable blankets, and adjustable mic placement. Keep your workspace open by mounting gear on walls or using vertical racks.
For example, hang foam panels on adjustable stands or attach portable reflection filters. When not recording, remove blankets or fold panels away. This flexibility keeps your closet booth functional and avoids that boxy, dead sound.
Strategic placement of gear and treatment keeps the environment lively yet controlled. Check out this article for practical tips.
Frequently Asked Questions
Is acoustic foam enough for a closet booth?
Acoustic foam helps reduce high-frequency reflections, but it won’t control low-end buildup or sound leakage. For best results, combine foam with dense bass traps and sealing gaps around the door.Where should I place the mic in a closet?
Position your mic 6-12 inches away from the wall behind you, slightly above mouth level. Use a reflection filter to block bouncing sound and aim for the clearest, most natural tone.Do I need bass traps if my closet is small?
Yes. Small spaces naturally boost bass, creating a muddy sound. Use corner-mounted bass traps or thick acoustic panels to tame low frequencies and keep your sound balanced.How do I stop sound from leaking through the door?
Seal gaps with weatherstripping or draft stoppers, hang a thick blanket over the door, and consider a door sweep. These simple steps can cut noise leakage by 20-30 dB.Can I make a closet booth work without permanent construction?
Absolutely. Use portable panels, blankets, and adjustable mic placement. These solutions let you create an effective, flexible setup without major modifications.Conclusion
Separation and targeted acoustic treatment turn a cramped closet into a quiet, usable space — whether for recording or running a high-powered rig. The real secret? Think about placement first, then treat what’s most reflective and prone to low-end buildup. After all, a small space with good sound isn’t about filling every corner with foam — it’s about strategic choices.
So, if noise and heat are your enemy, consider moving your rig out of sight and treating the essentials. Your workspace stays silent, your gear stays cool, and your sound stays clear. Now, go make that closet work for you — quietly.